We were at Walt Disney World about 13 years ago when we realized we needed to get a wheelchair-accessible van for our daughter. It seems like a strange place to have this revelation, but when you’re lifting a wheelchair into the trunk of your van multiple times a day and then lifting your child into the same van, it hits you. This isn’t working anymore! Whatever prompts you to decide whether a wheelchair-accessible van is necessary for your family, welcome to the market. There are a lot of choices and factors to consider when making this decision. We have our third accessible van and it was a learning process through each one.
Our first van was a Mercury Monterey that had a non-motorized rear entry. Our second was a Chrysler Town and Country that had a non-motorized side entry ramp and our current van is a Pacifica that is a motorized side-entry van. The first van was a used van we bought from a family that no longer needed it. We just took over their car payment. We were so fortunate; it was an easy first step into the conversion van market. The second van we had modified after we bought it, and the third we bought used with very few miles on it.
Converting a vehicle to an accessible van is an expensive endeavor. The cost depends on what modifications need to be made to the vehicle. Basic conversion can range from $15,000-20,000 and up to $60,000 for specialized modifications. This is on top of the cost of the vehicle. That is an enormous expense and you should know what you’re getting yourself into.
New v Used
The first decision you will make is whether to get a new van where you customize the conversion or a van that someone else had converted. Obviously, a new conversion is more expensive than a used van. Depending on how much you can spend on the vehicle, a used van is a good way to break into the market. Our first van was a used van, and it worked well for us. We kept it for 7 years (it was three years old when we bought it) and it gave us a lot of insight into what we wanted in a van. Our current vehicle had one previous owner, but it had the conversions we wanted. We bought our current van from the same dealership that did the conversions for our second van. We knew we could trust them. If you are buying used, make sure the van is certified and (ideally) still under a factory-backed warranty. Only buy from a reputable dealer. It is important to do your homework and the National Mobility Equipment Dealers Association and the NHTSA are great places to start.
Our second van was a new conversion. This allowed us to have input into how the modifications were done. We could personalize it more. For this van, we bought the van and then had a company convert it for wheelchair access. We chose this route because our insurance company agreed to pay for the conversion. I doubt we would have chosen this path if we were paying for it ourselves. I think the best choice is a used van with a few miles on it. But remember, it is only a good deal if the van has what your family needs.
Rear entry ramp
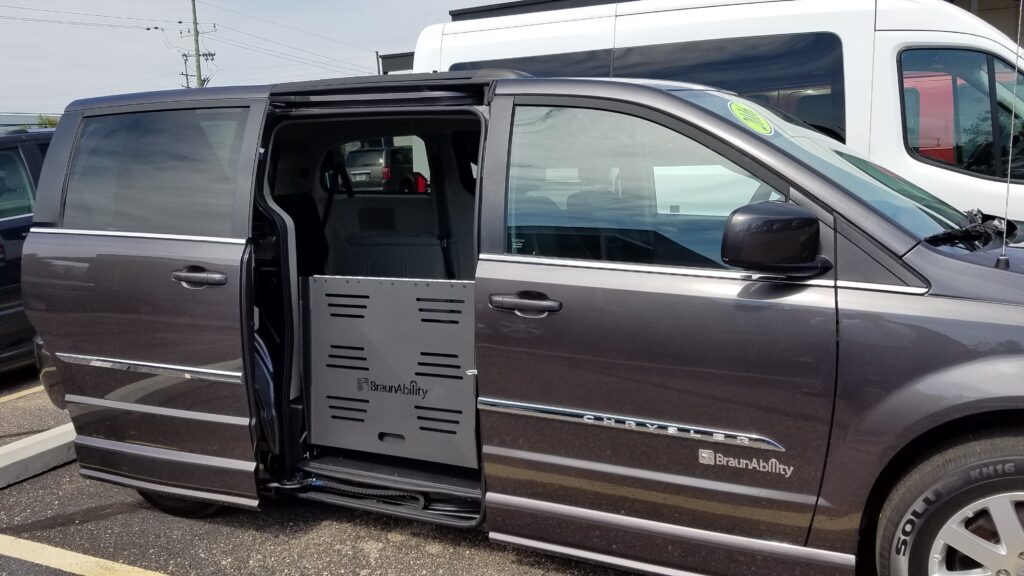
Side entry manual ramp
Entry Access
Your choices for wheelchair access to the vehicle are rear or side entry with the ramps motorized or manual. We have owned each style. We have never had a lifting platform style left, though we have used one when traveling. There are advantages and disadvantages to these options, but I can’t imagine going back to a rear-entry manual ramp after having a side-entry motorized one.
Rear entry– Our first van was rear entry, and it worked well for us as a first van. We were at the point where we could not lift our daughter’s wheelchair into our regular van and move her into the van safely. We didn’t want to hurt ourselves by lifting it. A family we knew lost their daughter and offered us the van if we paid off the rest of the loan. This was a great deal for us. It came along at the right time and at a reasonable cost. We loved being able to leave Reagan in her wheelchair while we drove. This made taking her places significantly easier.
It was not ideal, though. The rear entry felt like we were losing a lot of space. Especially when traveling. We did not want to put things behind her chair, so there was limited space. She rolled into the van and there was a seat on each side of her, but it moved the seats to the side so the chair could fit and this made the seats uncomfortable for adults. Fortunately for us, her sister was young and fit easily. I did not like backing the chair out of the van. It felt unsafe. If she could move out of the van, it would have made me very nervous. The upside is that it was less expensive and much easier to park. If we could not find designated handicapped parking, it was still easy to get her out of the van.
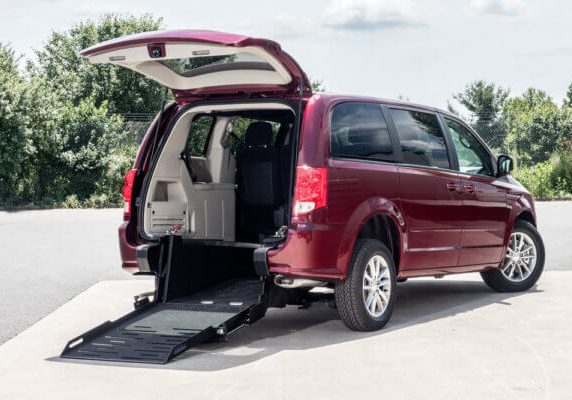
Side entry- Our second and third vans were side-entry. The second was a non-motorized ramp, meaning we had to unfold the ramp and refold it every time we used the ramp. It was better than a rear entry ramp but, in the rain, and the snow, it became very difficult. After a while, I really felt this in my back, as well. Initially, we went with a manual ramp because it saved money and reduced the risk of something electronic failing. We didn’t want to deal with that hassle. We were wrong. The motorized ramp is life-changing! In-Floor vs. Fold-Out ramps.
The third van has a motorized side entry ramp, and it was well worth it in cost. Side entry allowed us to have a third-row seat in the back for our daughter and her friends to use. This opened up space to have passengers, though it limited the trunk space. It worked well for normal driving but we had to buy luggage storage for the roof for trips. The hardest part is finding van-accessible parking. It is difficult. Unfortunately, people needing handicapped parking take van-accessible spots even if they don’t need them. If the ramp does not have room to extend out, you can’t get your child out. Having an easy side entry outweighs this factor, but it is still difficult sometimes.
The conversion for a side entry van is more expensive. More parts of the van need to be moved to accommodate the placement of the ramp. Because more conversion needs to be done, the ride can be noisier than what you’re used to.
Wheelchair Tie-Downs v Occupant Restraint System
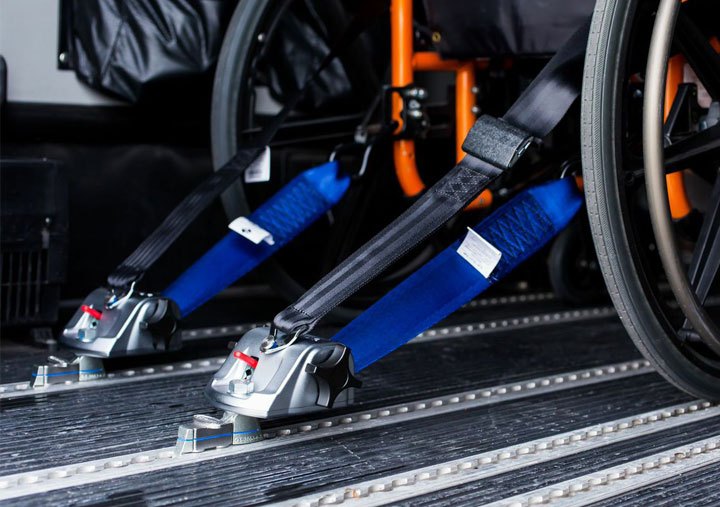
No matter which style of ramp you choose, the wheelchair will need to be secured. The least expensive option is a tie-down system. If your child takes a school bus, then you are familiar with this style. You attach straps to the wheelchair and to the tracking system on the floor of the van and tighten them. This secures the chair, and a seatbelt secures your child. The seat belt goes around the chair. These come standard in converted vans. We had this for a short time in our first van. It is a secure way of driving, but it takes so much time to hook the chair in and secure it. We needed to move around to different sides of the van to attach straps. In the rain and snow, it really was a pain, but still better than lifting a wheelchair into a van.
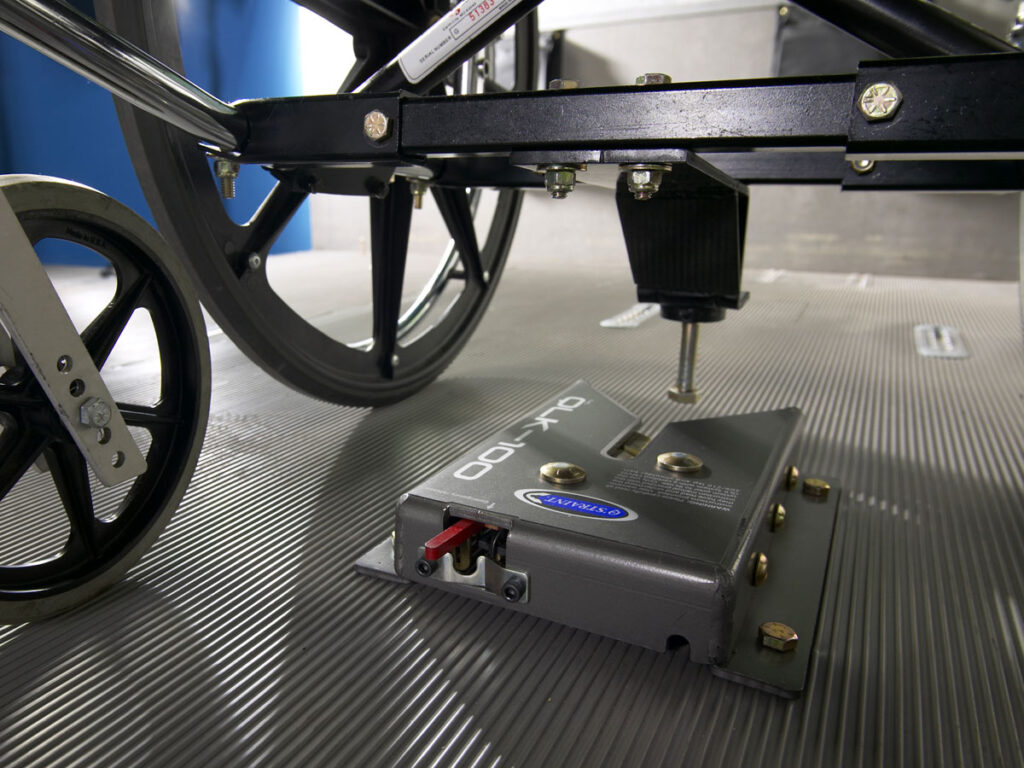
The other option is an Occupant Restraint System. They often refer these to as a Locking or Docking System. In this system, they attached a part to the bottom of the wheelchair that will lock into the mount on the floor of the van. It holds the wheelchair securely in place with no tie-downs. There is a cost to this system- having it installed, maintained, and attaching it to the wheelchair. If you get a new wheelchair, the locking system needs to be put on the new chair as well. We love this system and could never imagine going back to a tie-down system, but it is more expensive. There is a control panel that needs to be installed that lets you know if it does not lock the chair in place, releases the locking system once we turn the car off, and warning systems. We use Easy Lock and it is about $1500 to have the system installed. This does not include the cost of installing the part in the wheelchair.
You still need to use a seatbelt with both systems. The tie-down and docking system lock the wheelchair to the van, but a seatbelt is necessary to secure your child in case of an accident. A wheelchair-accessible van is an enormous investment. If you need one, then make sure you are getting the system you can afford. You can always upgrade vans later. Your child’s safety is the number one concern, but if you cannot afford all the “bells and whistles”, don’t overstretch yourself to get them.
Additional Resources:
Crash Tested Products by the University of Michigan website for Wheelchair Transportation Safety.
How I Learned to Relax While Traveling with my Disabled Child